Learning photography: composition
I’ve been taking pictures with mine for years, as I imagine most smartphone owners do. When I see something picture-worthy, I pull out my smartphone and take a shot. But I never seem to be able to do the scenes justice. The pictures always fall flat. What I found so captivating when seeing it with my own eyes is nowhere to be seen in the picture.
I wanted to learn how to take pictures that captures what I like about the scenes. So, to improve my photography skills I decided to learn the foundations.
The books I read covered a wide array of topics. Composition, lighting, technical knowledge (e.g. lenses, exposure), how to recognize picture-worthy scenes, and much more. It was great to read about all that, and it showed me many areas to learn and improve.
But as an amateur photographer it’s too much to focus on at once. I have to take my time and practice step by step.
Composition, learning how to arrange the elements, appeared to be the foundation. Other topics, like lighting for example, build on top of composition. Which is the reason why I focused my efforts on improving my composition skills before anything else.
Composition
Composition is a catchall term that covers a bunch of techniques and guidelines. The ones I learned about are leading lines, framing, foreground interest, symmetry, landscape vs portrait,, rule of thirds, and visual weight.
It’s possible to take great pictures without those guidelines, or by breaking them, but as a beginner they helped me improve my pictures. And knowing about them sharpened my eye.
I classify them in 2 areas
- Creating balance in the picture: symmetry, rule of thirds, visual weight
- Guiding the eye of the viewer: leading lines, framing, foreground interest, landscape vs portrait
They can be arbitrarily combined. It’s not necessary to use all of them, and using more of them doesn’t guarantee a great result. It takes experimentation and experience. For me, this knowledge combined with intuition and experimentation (taking many pictures of the same subject) creates the best results. And I assume (hope) that over time the accumulated experience will allow me to take better pictures with fewer takes.
Guiding the eye
Techniques for guiding the eye are about connecting the viewer with the picture.
My pictures often appeared lifeless, and the primary reason was that I photographed the main subject without paying attention to the surroundings. The result was that the images had nothing that draws the viewer in. Nothing that connects the viewer with the subject. Techniques to guide the eye to the subject fix that.
Foreground interest
When photographing a subject that’s large or far away, images often feel disconnected and lose their sense of depth. Objects in the foreground can counteract that effect. They are a stepping stone into the image, towards the subject.
This is particularly important for landscape photography. It’s easy to focus on the big picture, on the landscape. But a good picture also needs something close by to connect the viewer to the subject or landscape.

In this picture, the subject is the Arco da Rua Augusta (the building). The bucket and the bag with the red jacket were happy accidents (I didn’t know they were there, didn’t pay attention to them). Without them, the foreground would be empty, and there would be nothing to connect the viewer to the subject further back.
As a side note, cropping the image, shaving some off the top, would probably further improve it.
Framing
Framing is surrounding (parts of) the picture with something that resembles a frame. It can be anything, a window, a door frame, or any other kind of opening. The frame calls attention to the part of the picture that’s inside.

In this picture the scenery is framed by the stone wall around it.
Framing can have a stronger impact if there was a specific subject that’s worthy of framing, and if it frames only part of the picture.
Here, the frame covers the whole picture. I still like it, but mostly because of the symmetry (I’ll reuse the picture later in this article).
The pictures with framing that I have all cover the full image. More complex scenes, where only part of the image is framed, and the other part still is interesting enough to be in the picture, are much more difficult to spot.
Leading lines
Leading lines are any objects that create some sort of line. They help drawing viewers into the picture. They guide the eye of the viewer to a specific part, often the subject.
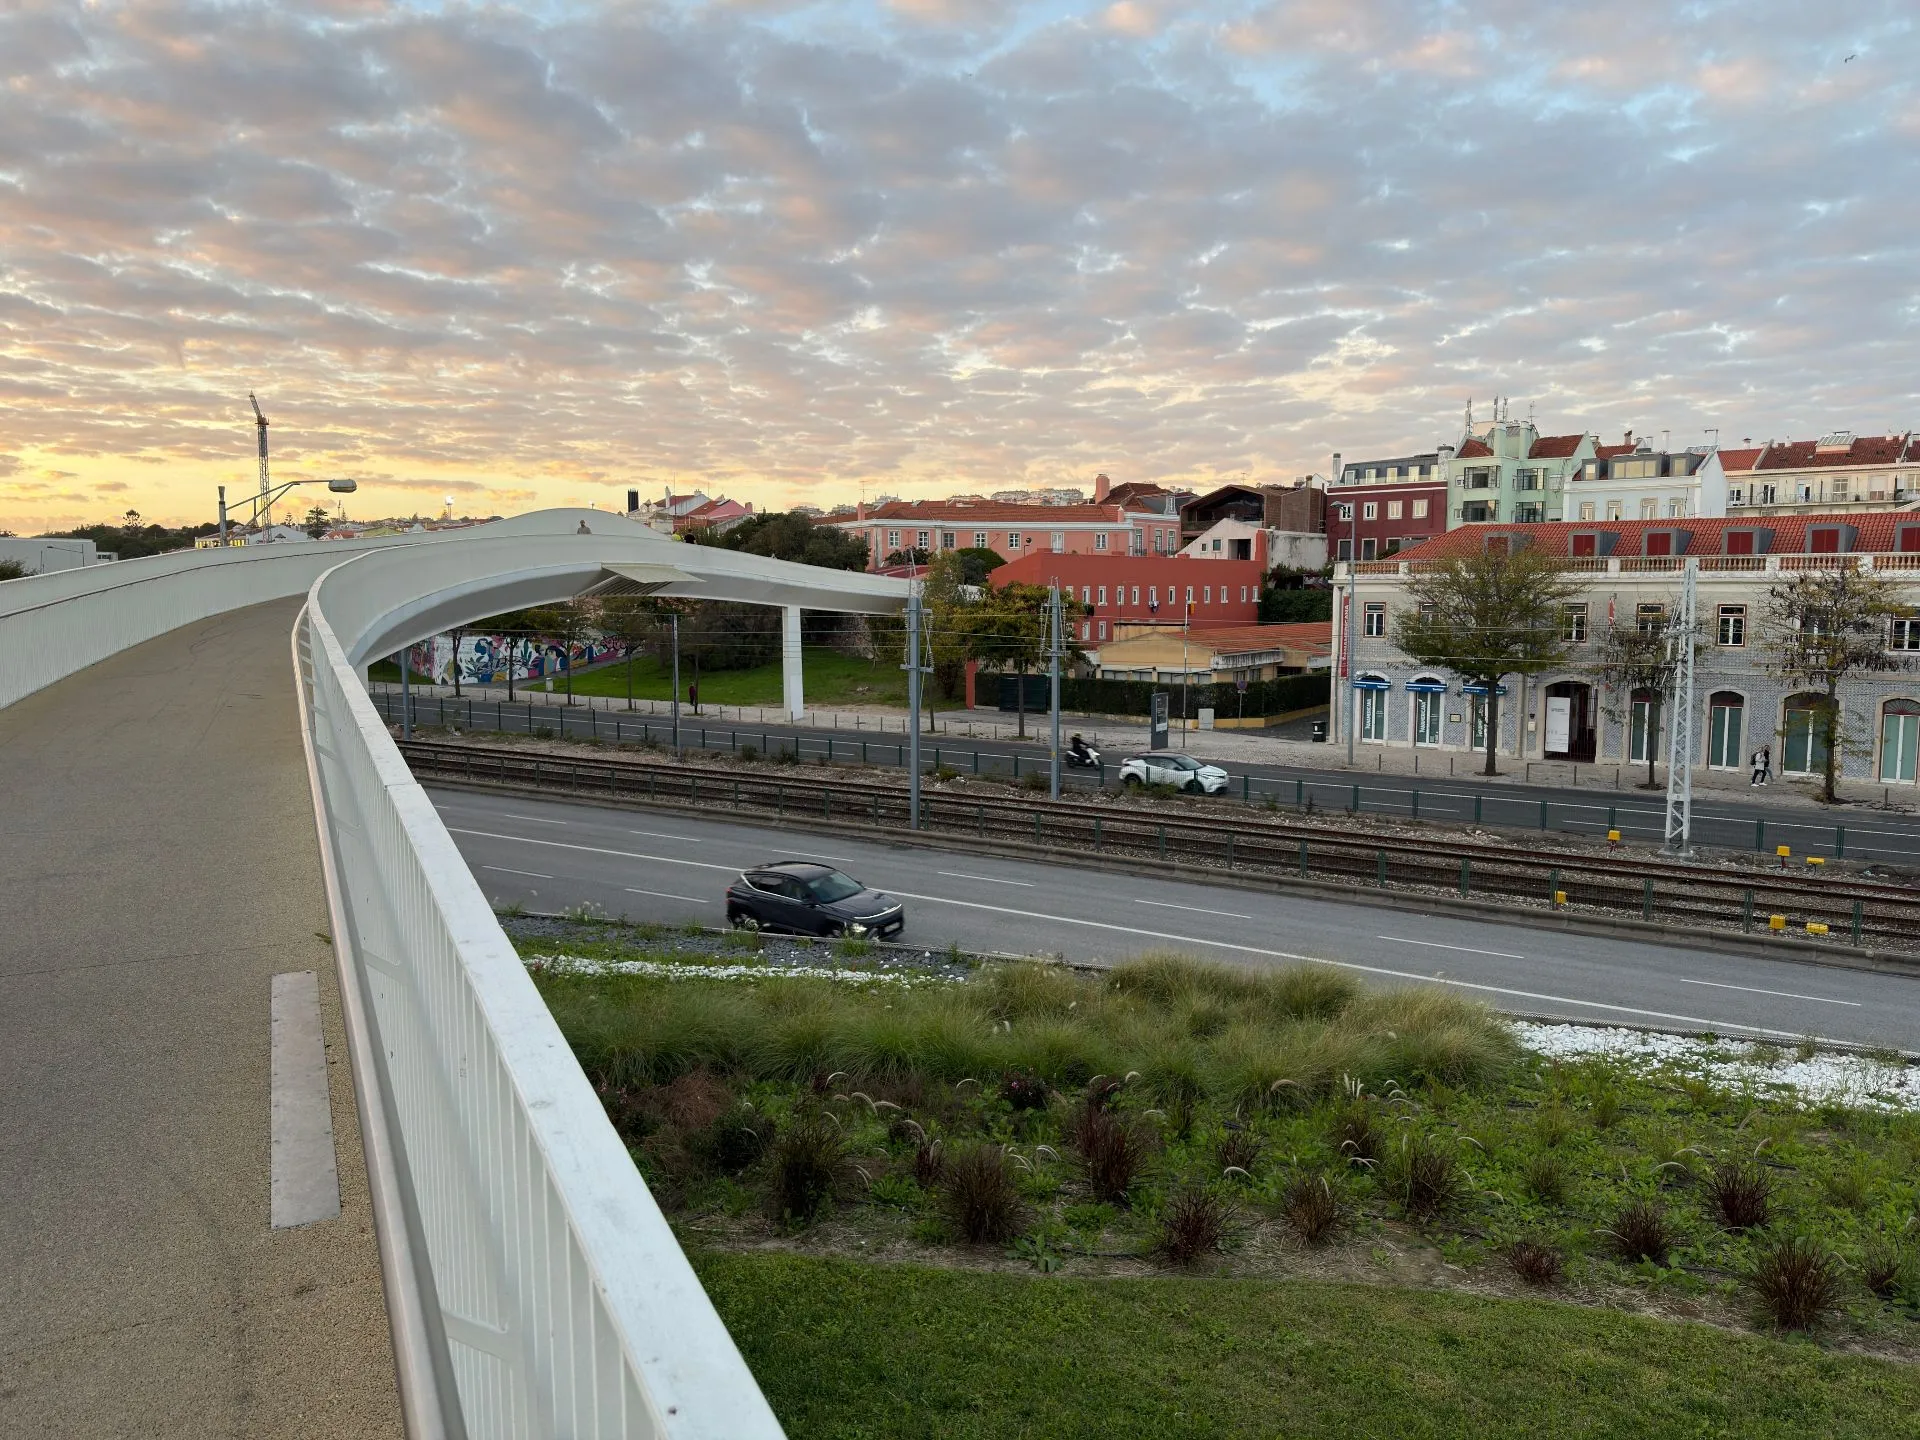
In this picture I used the bridge as a leading line going to the colorful buildings in the back. Without the bridge, it would be a picture of random buildings in the background.
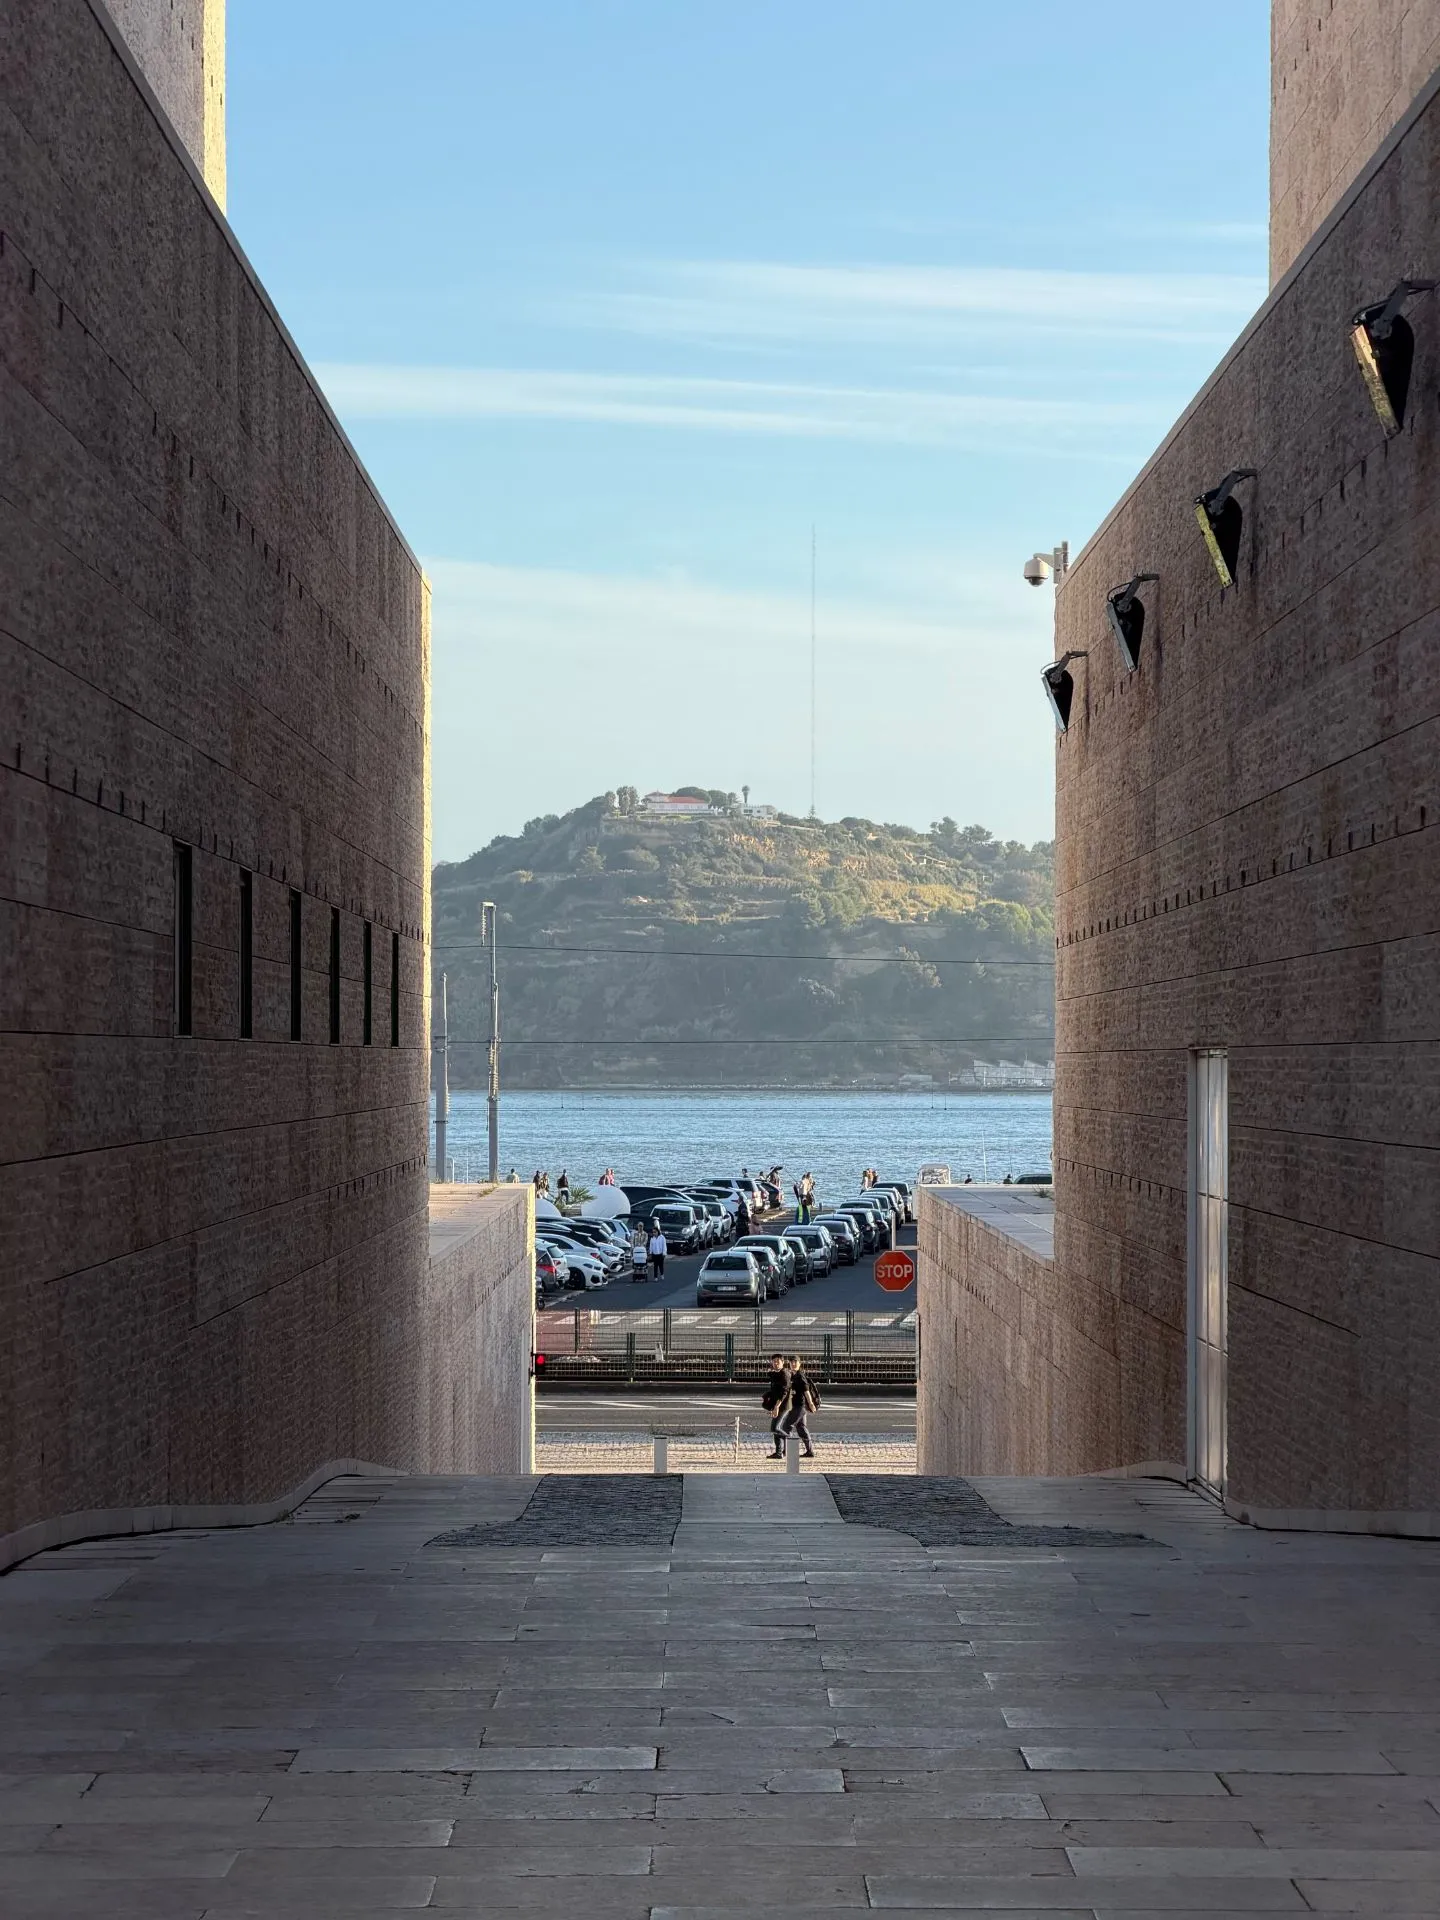
Landscape vs portrait
I was never quite sure which orientation to take my pictures in. I mostly decided that based on the picture and how the scene would fit in it.
Now I know that landscape pictures encourage the eye to move from side to side, while portrait pictures encourage up and down movement. It’s best to choose the orientation that matches the flow of the subject, or the dominant lines in the image.
For example, in the image above (Leading lines section), the dominant line is the bridge. At first it goes straight into the image, but the more important part is when it turns right and becomes horizontal. This is why I shot it in landscape.
In the image below, the eye should quite clearly move from the street in the front to the hill and building in the back. That’s why this picture is in portrait mode.
Creating balance
Balance in a photo creates harmony and evokes an emotional response. If the viewer is connected with the image (through the aforementioned techniques), balance is what causes captivation.
I imagine there are many more ways to evoke an emotional response and create great pictures. But for me, currently, harmony is what I’m after in my photos.
Symmetry
There is beauty in symmetry, and we are instinctively drawn to it. The same in pictures. However, if it’s too symmetric, it can feel a bit eerie, a bit too perfect. Slight imperfections make it interesting.
In this picture I like the frame (as mentioned before) but also the symmetric aspect of the man standing on the left and the stand on the right. They create a balance, without perfectly mirroring each other.
Rule of thirds
This is probably the most well-known technique. Pretty much every camera and camera app has a setting to show lines at 1/3rd and 2/3rd of the width and height.
The rule of thirds is about putting the subject at one of the points where the lines overlap. So that the focal point of the image is about a third of the width or height away from the center.
Putting the subject in the center can be too boring, too predictable. Moving it off-center can make the picture more exciting while still keeping it balanced.
Visual weight
The visual weight is how strong an element appears in the image. For a balanced picture, the size of elements are less important than their visual weights. If one element looks heavier than the others, it should take less space in the picture to balance it out.
Finding the correct relationship between the elements is complicated. I haven’t read any specific tips, besides trusting yourself when taking and viewing the picture, and adjusting based on feeling.


I think it’s obvious why I like these pictures. The sky is breathtaking. What I find interesting though is that on my phone, the first picture looked better. There the balance of the bright sky and dark foreground was good. But when looking at them on my laptop (with a bigger screen), I find the second one better. I’m not sure what to make of that, maybe the size of the image changes the visual balance?
Final words
Photos are good if they create an emotional response. As I paid more attention to the mentioned techniques, it became easier to create such pictures, but they’re by no means a requirement. The books I read mentioned that it’s also possible to take great pictures by throwing all rules out the window. It’s much more difficult though, it takes a trained eye which I, as an amateur, don’t have. So for now I’ll use these rules when taking pictures.
And I am happy that I finally decided to read photography books. With that little investment my pictures are 10x better than before.